
Javassm - SpringMVC6
解读DispatcherServlet源码
到目前为止,关于SpringMVC的相关内容就学习得差不多了
了解一下DispatcherServlet底层是如何进行调度的
源码分析
首先我们需要找到DispatcherServlet的最顶层HttpServletBean,在这里直接继承的HttpServlet
那么我们首先来看一下,它在初始化方法中做了什么:
public final void init() throws ServletException {
    //读取配置参数,并进行配置
    PropertyValues pvs = new HttpServletBean.ServletConfigPropertyValues(this.getServletConfig(), this.requiredProperties);
    if (!pvs.isEmpty()) {
        try {
            BeanWrapper bw = PropertyAccessorFactory.forBeanPropertyAccess(this);
            ResourceLoader resourceLoader = new ServletContextResourceLoader(this.getServletContext());
            bw.registerCustomEditor(Resource.class, new ResourceEditor(resourceLoader, this.getEnvironment()));
            this.initBeanWrapper(bw);
            bw.setPropertyValues(pvs, true);
        } catch (BeansException var4) {
            if (this.logger.isErrorEnabled()) {
                this.logger.error("Failed to set bean properties on servlet '" + this.getServletName() + "'", var4);
            }

            throw var4;
        }
    }
    //此初始化阶段由子类实现,
    this.initServletBean();
}
我们接着来看initServletBean()方法是如何实现的,它是在子类FrameworkServlet中定义的:
protected final void initServletBean() throws ServletException {
this.getServletContext().log("Initializing Spring " + this.getClass().getSimpleName() + " '" + this.getServletName() + "'");
if (this.logger.isInfoEnabled()) {
this.logger.info("Initializing Servlet '" + this.getServletName() + "'");
}
long startTime = System.currentTimeMillis();
try {
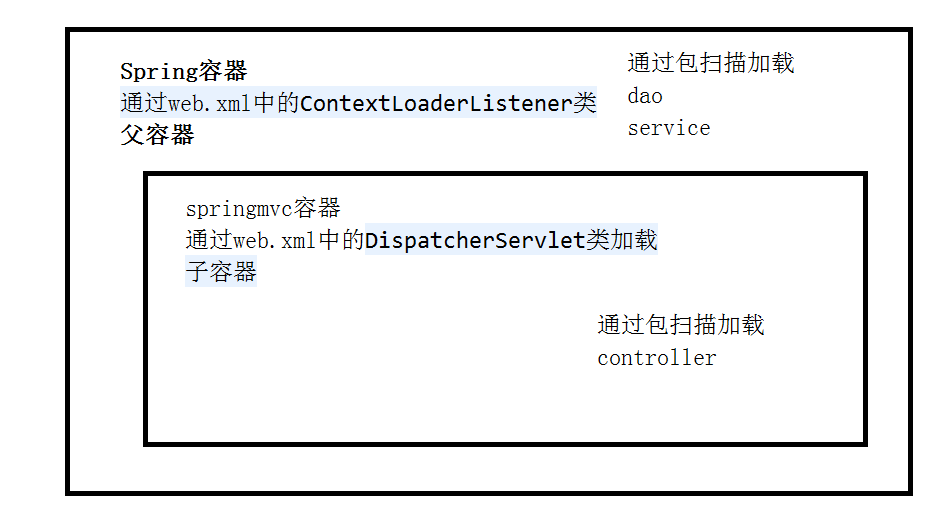
// 注意:我们在一开始说了SpringMVC有两个容器,一个是Web容器一个是根容器
// Web容器只负责Controller等表现层内容
// 根容器就是Spring容器,它负责Service、Dao等,并且它是Web容器的父容器。
// 初始化WebApplicationContext,这个阶段会为根容器和Web容器进行父子关系建立
this.webApplicationContext = this.initWebApplicationContext();
this.initFrameworkServlet();
} catch (RuntimeException | ServletException var4) {
//...以下内容全是打印日志
}
}
我们来看看initWebApplicationContext是如何进行初始化的:
protected WebApplicationContext initWebApplicationContext() {
    // 这里获取的是根容器,一般用于配置Service、数据源等
    WebApplicationContext rootContext = WebApplicationContextUtils.getWebApplicationContext(this.getServletContext());
    WebApplicationContext wac = null;
    if (this.webApplicationContext != null) {
        // 如果webApplicationContext在之前已经存在,则直接给到wac
        wac = this.webApplicationContext;
        if (wac instanceof ConfigurableWebApplicationContext) {
            ConfigurableWebApplicationContext cwac = (ConfigurableWebApplicationContext)wac;
            if (!cwac.isActive()) {
                if (cwac.getParent() == null) {
                    // 设定根容器为Web容器的父容器
                    cwac.setParent(rootContext);
                }

                this.configureAndRefreshWebApplicationContext(cwac);
            }
        }
    }

    if (wac == null) {
        // 如果webApplicationContext是空,那么就从ServletContext找一下有没有初始化上下文
        wac = this.findWebApplicationContext();
    }

    if (wac == null) {
        // 如果还是找不到,直接创个新的,并直接将根容器作为父容器
        wac = this.createWebApplicationContext(rootContext);
    }

    if (!this.refreshEventReceived) {
        synchronized(this.onRefreshMonitor) {
            //此方法由DispatcherServlet实现
            this.onRefresh(wac);
        }
    }

    if (this.publishContext) {
        String attrName = this.getServletContextAttributeName();
        //把Web容器丢进ServletContext
        this.getServletContext().setAttribute(attrName, wac);
    }

    return wac;
}
我们接着来看DispatcherServlet中实现的onRefresh()方法:
@Override
protected void onRefresh(ApplicationContext context) {
    initStrategies(context);
}

protected void initStrategies(ApplicationContext context) {
    //初始化各种解析器
    initMultipartResolver(context);
    initLocaleResolver(context);
    initThemeResolver(context);
    //在容器中查找所有的HandlerMapping,放入集合中
    //HandlerMapping保存了所有的请求映射信息(Controller中定义的),它可以根据请求找到处理器Handler,但并不是简单的返回处理器,而是将处理器和拦截器封装,形成一个处理器执行链(类似于之前的Filter)
    initHandlerMappings(context);
    //在容器中查找所有的HandlerAdapter,它用于处理请求并返回ModelAndView对象
    //默认有三种实现HttpRequestHandlerAdapter,SimpleControllerHandlerAdapter和AnnotationMethodHandlerAdapter
    //当HandlerMapping找到处理请求的Controller之后,会选择一个合适的HandlerAdapter处理请求
    //比如我们之前使用的是注解方式配置Controller,现在有一个请求携带了一个参数,那么HandlerAdapter会对请求的数据进行解析,并传入方法作为实参,最后根据方法的返回值将其封装为ModelAndView对象
    initHandlerAdapters(context);
    //其他的内容
    initHandlerExceptionResolvers(context);
    initRequestToViewNameTranslator(context);
    initViewResolvers(context);
    initFlashMapManager(context);
}
DispatcherServlet初始化过程我们已经了解了
DispatcherServlet调度
接着来看DispatcherServlet是如何进行调度的
首先我们的请求肯定会经过HttpServlet,然后其交给对应的doGet、doPost等方法进行处理
而在FrameworkServlet中,这些方法都被重写,并且使用processRequest来进行处理:
protected final void doGet(HttpServletRequest request, HttpServletResponse response) throws ServletException, IOException {
    this.processRequest(request, response);
}

protected final void doPost(HttpServletRequest request, HttpServletResponse response) throws ServletException, IOException {
    this.processRequest(request, response);
}
我们来看看processRequest做了什么:
protected final void processRequest(HttpServletRequest request, HttpServletResponse response) throws ServletException, IOException {
    // 前期准备工作
    long startTime = System.currentTimeMillis();
    Throwable failureCause = null;
    LocaleContext previousLocaleContext = LocaleContextHolder.getLocaleContext();
    LocaleContext localeContext = this.buildLocaleContext(request);
    RequestAttributes previousAttributes = RequestContextHolder.getRequestAttributes();
    ServletRequestAttributes requestAttributes = this.buildRequestAttributes(request, response, previousAttributes);
    WebAsyncManager asyncManager = WebAsyncUtils.getAsyncManager(request);
    asyncManager.registerCallableInterceptor(FrameworkServlet.class.getName(), new FrameworkServlet.RequestBindingInterceptor());
    this.initContextHolders(request, localeContext, requestAttributes);

    try {
        // 重点在这里,这里进行了Service的执行,不过是在DispatcherServlet中定义的
        this.doService(request, response);
    } catch (IOException | ServletException var16) {
        //...
}
请各位一定要耐心,这些大型框架的底层一般都是层层套娃,因为这样写起来层次会更加清晰
来看看DispatcherServlet中是如何实现的:
protected void doService(HttpServletRequest request, HttpServletResponse response) throws Exception {
   //...
    try {
        //重点在这里,这才是整个处理过程中最核心的部分
        this.doDispatch(request, response);
    } finally {
        //...
}
最核心的部分了:
protected void doDispatch(HttpServletRequest request, HttpServletResponse response) throws Exception {
    HttpServletRequest processedRequest = request;
    HandlerExecutionChain mappedHandler = null;
    boolean multipartRequestParsed = false;
    WebAsyncManager asyncManager = WebAsyncUtils.getAsyncManager(request);

    try {
        try {
            ModelAndView mv = null;
            Object dispatchException = null;

            try {
                processedRequest = this.checkMultipart(request);
                multipartRequestParsed = processedRequest != request;
                // 在HandlerMapping集合中寻找可以处理当前请求的HandlerMapping
                mappedHandler = this.getHandler(processedRequest);
                if (mappedHandler == null) {
                    this.noHandlerFound(processedRequest, response);
                    //找不到HandlerMapping则无法进行处理
                    return;
                }

                // 根据HandlerMapping提供的信息,找到可以处理的HandlerAdapter
                HandlerAdapter ha = this.getHandlerAdapter(mappedHandler.getHandler());
                String method = request.getMethod();
                boolean isGet = HttpMethod.GET.matches(method);
                if (isGet || HttpMethod.HEAD.matches(method)) {
                    long lastModified = ha.getLastModified(request, mappedHandler.getHandler());
                    if ((new ServletWebRequest(request, response)).checkNotModified(lastModified) && isGet) {
                        return;
                    }
                }

                // 执行所有拦截器的preHandle()方法
                if (!mappedHandler.applyPreHandle(processedRequest, response)) {
                    return;
                }

                // 使用HandlerAdapter进行处理(我们编写的请求映射方法在这个位置才真正地执行了)
                // HandlerAdapter会帮助我们将请求的数据进行处理,再来调用我们编写的请求映射方法
                // 最后HandlerAdapter会将结果封装为ModelAndView返回给mv
                mv = ha.handle(processedRequest, response, mappedHandler.getHandler());
                if (asyncManager.isConcurrentHandlingStarted()) {
                    return;
                }

                this.applyDefaultViewName(processedRequest, mv);
                //执行所有拦截器的postHandle()方法
                mappedHandler.applyPostHandle(processedRequest, response, mv);
            } catch (Exception var20) {
                dispatchException = var20;
            } catch (Throwable var21) {
                dispatchException = new NestedServletException("Handler dispatch failed", var21);
            }

            // 最后处理结果,对视图进行渲染等,如果抛出异常会出现错误页面
            this.processDispatchResult(processedRequest, response, mappedHandler, mv, (Exception)dispatchException);
        } catch (Exception var22) {
            this.triggerAfterCompletion(processedRequest, response, mappedHandler, var22);
        } catch (Throwable var23) {
            this.triggerAfterCompletion(processedRequest, response, mappedHandler, new NestedServletException("Handler processing failed", var23));
        }

    } finally {
        if (asyncManager.isConcurrentHandlingStarted()) {
            if (mappedHandler != null) {
                mappedHandler.applyAfterConcurrentHandlingStarted(processedRequest, response);
            }
        } else if (multipartRequestParsed) {
            this.cleanupMultipart(processedRequest);
        }

    }
}
所以,根据以上源码分析得出最终的流程图:
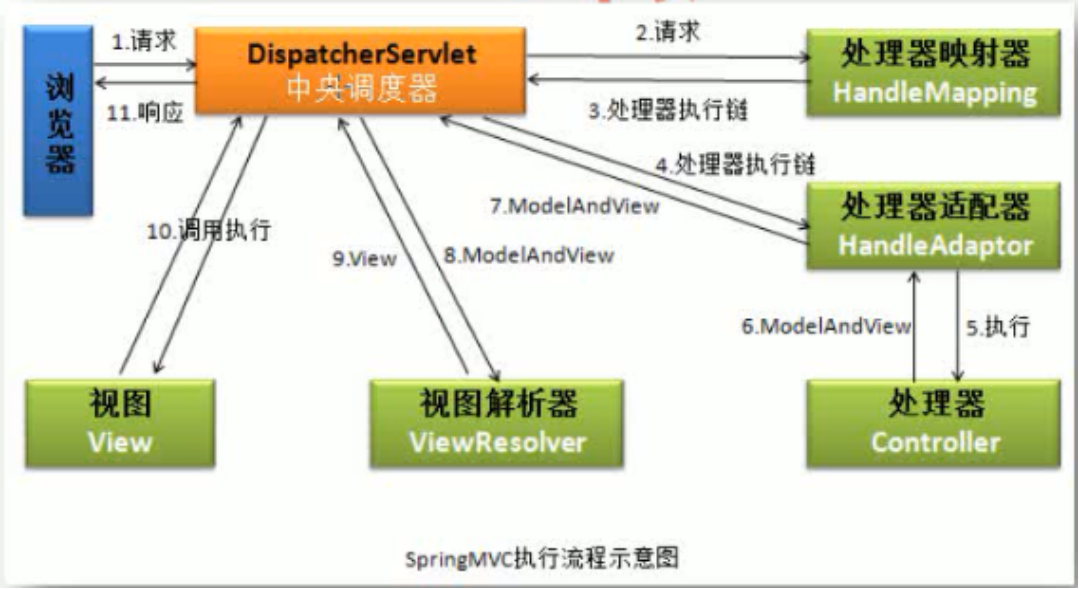
虽然完成本章学习后,我们已经基本能够基于Spring去重新编写一个更加高级的图书管理系统了,但是登陆验证复杂的问题依然没有解决,如果我们依然按照之前的方式编写登陆验证,显然太过简单,它仅仅只是一个登陆,但是没有任何的权限划分或是加密处理,我们需要更加高级的权限校验框架来帮助我们实现登陆操作,下一章,我们会详细讲解如何使用更加高级的SpringSecurity框架来进行权限验证。