
Javassm - 数据库框架整合2
数据库框架整合2
整合Mybatis框架
通过了解数据源,我们已经清楚,Mybatis实际上是在使用自己编写的数据源(数据源实现其实有很多)默认使用的是池化数据源,它预先存储了很多的连接对象。
如何将Mybatis与Spring更好的结合
使用例子
比如我们现在希望将SqlSessionFactory交给IoC容器进行管理,而不是我们自己创建工具类来管理(我们之前一直都在使用工具类管理和创建会话)
<!-- 这两个依赖不用我说了吧 -->
<dependency>
    <groupId>org.mybatis</groupId>
    <artifactId>mybatis</artifactId>
    <!-- 注意,对于Spring 6.0来说,版本需要在3.5以上 -->
    <version>3.5.13</version>
</dependency>
<dependency>
    <groupId>com.mysql</groupId>
    <artifactId>mysql-connector-j</artifactId>
    <version>8.0.31</version>
</dependency>
<!-- Mybatis针对于Spring专门编写的支持框架 -->
<dependency>
    <groupId>org.mybatis</groupId>
    <artifactId>mybatis-spring</artifactId>
    <version>3.0.2</version>
</dependency>
<!-- Spring的JDBC支持框架 -->
<dependency>
     <groupId>org.springframework</groupId>
     <artifactId>spring-jdbc</artifactId>
     <version>6.0.10</version>
</dependency>
SqlSessionTemplate类
在mybatis-spring依赖中,为我们提供了SqlSessionTemplate类,它其实就是官方封装的一个工具类,我们可以将其注册为Bean
这样我们随时都可以向IoC容器索要对象,而不用自己再去编写一个工具类了,我们可以直接在配置类中创建。
对于这种别人编写的类型,如果要注册为Bean,那么只能在配置类中完成:
@Configuration
@ComponentScan("org.example.entity")
public class MainConfiguration {
    // 注册SqlSessionTemplate的Bean
    @Bean
    public SqlSessionTemplate sqlSessionTemplate() throws IOException {
        SqlSessionFactory factory = new SqlSessionFactoryBuilder().build(Resources.getResourceAsReader("mybatis-config.xml"));
        return new SqlSessionTemplate(factory);
    }
}
其他配置
这里写一个测试的Mapper类:
@Data
public class Student {
    private int sid;
    private String name;
    private String sex;
}
public interface TestMapper {
    @Select("select * from student where sid = 1")
    Student getStudent();
}
最后是配置文件:
<?xml version="1.0" encoding="UTF-8" ?>
<!DOCTYPE configuration
        PUBLIC "-//mybatis.org//DTD Config 3.0//EN"
        "http://mybatis.org/dtd/mybatis-3-config.dtd">
<configuration>
    <environments default="development">
        <environment id="development">
            <transactionManager type="JDBC"/>
            <dataSource type="POOLED">
                <property name="driver" value="com.mysql.cj.jdbc.Driver"/>
                <property name="url" value="jdbc:mysql://localhost:3306/study"/>
                <property name="username" value="root"/>
                <property name="password" value="123456"/>
            </dataSource>
        </environment>
    </environments>
    <mappers>
        <mapper class="org.example.mapper.TestMapper"/>
    </mappers>
</configuration>
测试
public static void main(String[] args) {
    ApplicationContext context = new AnnotationConfigApplicationContext(MainConfiguration.class);
    SqlSessionTemplate template = context.getBean(SqlSessionTemplate.class);
    TestMapper testMapper = template.getMapper(TestMapper.class);
    System.out.println(testMapper.getStudent());
}

这样,我们就成功将Mybatis与Spring完成了初步整合,直接从容器中就能获取到SqlSessionTemplate,结合自动注入,我们的代码量能够进一步的减少。
虽然这样已经很方便了,但是还不够方便,我们依然需要手动去获取Mapper对象,那么能否直接得到对应的Mapper对象呢
自动管理Mapper MapperScan
我们希望让Spring直接帮助我们管理所有的Mapper,当需要时,可以直接从容器中获取,我们可以直接在配置类上方添加注解:
@Configuration
@ComponentScan("org.example.entity")
@MapperScan("org.example.mapper")
public class MainConfiguration {

}
这样,Mybatis就会自动扫描对应包下所有的接口,并直接被注册为对应的Mapper作为Bean管理,那么我们现在就可以直接通过容器获取了:
public static void main(String[] args) {
    ApplicationContext context = new AnnotationConfigApplicationContext(MainConfiguration.class);
    TestMapper mapper = context.getBean(TestMapper.class);
    System.out.println(mapper.getStudent());
}
在我们后续的SpringBoot学习阶段,会有更加方便的方式来注册Mapper,我们只需要一个@Mapper注解即可完成,非常简单。
请一定注意,必须存在SqlSessionTemplate或是SqlSessionFactoryBean的Bean,否则会无法初始化(毕竟要数据库的链接信息)
全注解配置
我们接着来看,如果我们希望直接去除Mybatis的配置文件,完全实现全注解配置,那么改怎么去实现呢?
继承SqlSessionFactoryBean类
我们可以使用SqlSessionFactoryBean类:
@Configuration
@ComponentScan("org.example.entity")
@MapperScan("org.example.mapper")
public class MainConfiguration {
    @Bean
    //单独创建一个Bean,方便之后更换
    public DataSource dataSource(){
        return new PooledDataSource("com.mysql.cj.jdbc.Driver",
                "jdbc:mysql://localhost:3306/study", "root", "123456");
    }

    @Bean
    public SqlSessionFactoryBean sqlSessionFactoryBean(DataSource dataSource){  //直接参数得到Bean对象
        SqlSessionFactoryBean bean = new SqlSessionFactoryBean();
        bean.setDataSource(dataSource);
        return bean;
    }
}
首先我们需要创建一个数据源的实现类,因为这是数据库最基本的信息,然后再给到SqlSessionFactoryBean实例
这样,我们相当于直接在一开始通过IoC容器配置了SqlSessionFactory,这里只需要传入一个DataSource的实现即可,我们采用池化数据源。
删除配置文件,重新再来运行,同样可以正常使用Mapper。
从这里开始,通过IoC容器,Mybatis已经不再需要使用配置文件了,在我们之后的学习中,基于Spring的开发将不会再出现Mybatis的配置文件。
HikariCP连接池
数据源还有其他实现,比如C3P0、Druid等,都是非常优秀的数据源实现
这里要介绍的,是在SpringBoot中还会遇到的HikariCP连接池。
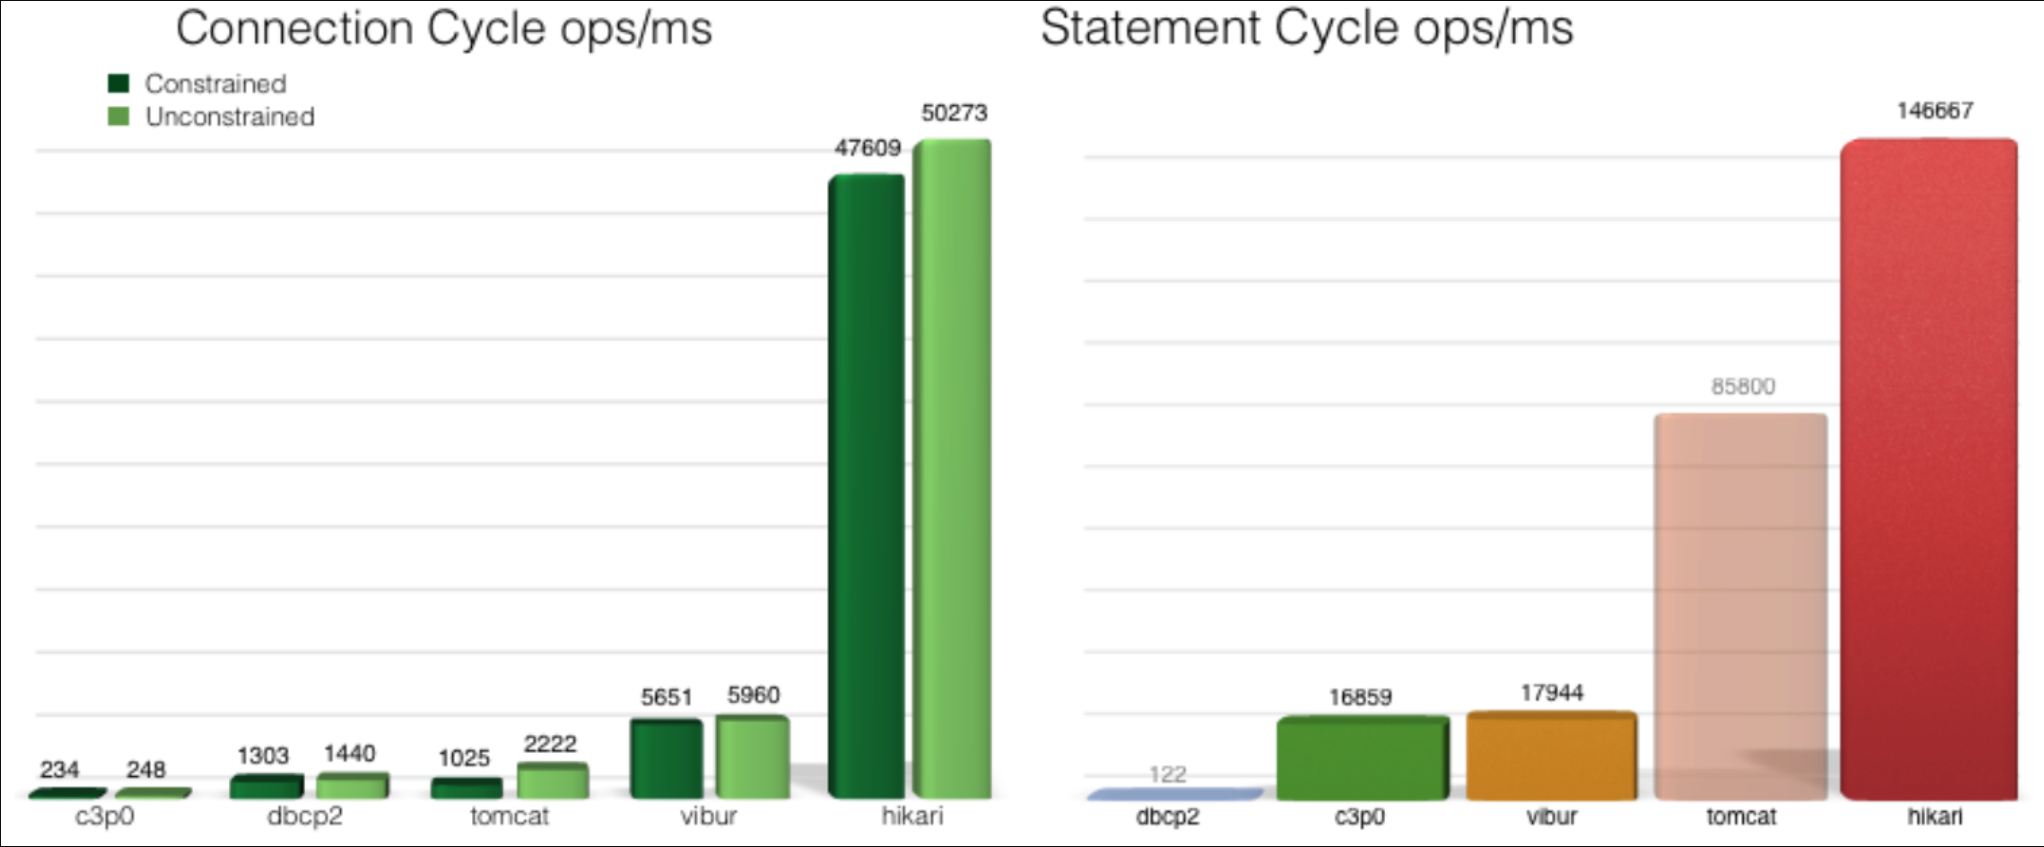
HikariCP是由日本程序员开源的一个数据库连接池组件,代码非常轻量,并且速度非常的快。根据官方提供的数据,在酷睿i7开启32个线程32个连接的情况下,进行随机数据库读写操作,HikariCP的速度是现在常用的C3P0数据库连接池的数百倍。在SpringBoot 3.0中,官方也是推荐使用HikariCP。
首先,我们需要导入依赖:
<dependency>
    <groupId>com.zaxxer</groupId>
    <artifactId>HikariCP</artifactId>
    <version>5.0.1</version>
</dependency>
要更换数据源实现,非常简单
可以直接声明一个Bean:
@Bean
public DataSource dataSource() {
    HikariDataSource dataSource = new HikariDataSource();
    dataSource.setJdbcUrl("jdbc:mysql://localhost:3306/study");
    dataSource.setDriverClassName("com.mysql.cj.jdbc.Driver");
    dataSource.setUsername("root");
    dataSource.setPassword("123456");
    return dataSource;
}
最后我们发现,同样可以得到输出结果,但是出现了一个报错:
SLF4J: No SLF4J providers were found.
SLF4J: Defaulting to no-operation (NOP) logger implementation
SLF4J: See http://www.slf4j.org/codes.html#noProviders for further details.
此数据源实际上是采用了SLF4J日志框架打印日志信息,但是现在没有任何的日志实现
(slf4j只是一个API标准,它规范了多种日志框架的操作,统一使用SLF4J定义的方法来操作不同的日志框架)
我们这里就使用JUL作为日志实现,我们需要导入另一个依赖:
<dependency>
    <groupId>org.slf4j</groupId>
    <artifactId>slf4j-jdk14</artifactId>
    <version>1.7.25</version>
</dependency>
<dependency>
    <groupId>org.slf4j</groupId>
    <artifactId>slf4j-api</artifactId>
    <version>1.7.25</version>
</dependency>
注意版本一定要和slf4j-api保持一致
这样,HikariCP数据源的启动日志就可以正常打印出来了:
8月 21, 2025 12:10:11 下午 com.zaxxer.hikari.HikariDataSource getConnection
信息: HikariPool-1 - Starting...
8月 21, 2025 12:10:12 下午 com.zaxxer.hikari.pool.HikariPool checkFailFast
信息: HikariPool-1 - Added connection com.mysql.cj.jdbc.ConnectionImpl@18245eb0
8月 21, 2025 12:10:12 下午 com.zaxxer.hikari.HikariDataSource getConnection
信息: HikariPool-1 - Start completed.
Student(sid=1, name=penguin, sex=男)
在SpringBoot阶段,我们还会遇到HikariPool-1 - Starting...和HikariPool-1 - Start completed.同款日志信息。
当然,Lombok肯定也是支持这个日志框架快速注解的:
@Slf4j
public class Main {
    public static void main(String[] args) {
        ApplicationContext context = new AnnotationConfigApplicationContext(MainConfiguration.class);
        TestMapper mapper = context.getBean(TestMapper.class);
        log.info(mapper.getStudent().toString());
    }
}
自动在 Main 类中生成一个名为 log 的 Logger 对象(类型是 org.slf4j.Logger)
使用时可以直接调用 log.info(...)、log.debug(...)、log.error(...) 等方法来打印日志。