
Javassm - Spring高级特性 (Aware接口+任务调度+监听器)
Spring高级特性1
Bean Aware
在Spring中提供了一些以Aware结尾的接口,实现了Aware接口的bean在被初始化之后,可以获取相应资源。
Aware的中文意思为感知。
简单来说,他就是一个标识,实现此接口的类会获得某些感知能力,Spring容器会在Bean被加载时,根据类实现的感知接口,会调用类中实现的对应感知方法。
比如BeanNameAware之类的以Aware结尾的接口,这个接口获取的资源就是BeanName:
@Component
public class Student implements BeanNameAware {
    //我们只需要实现这个接口就可以了

    @Override
    public void setBeanName(String name) {
        //Bean在加载的时候,容器就会自动调用此方法,将Bean的名称给到我们
        System.out.println("我在加载阶段获得了Bean名字:"+name);
    }
}
又比如BeanClassLoaderAware,那么它能够使得我们可以在Bean加载阶段就获取到当前Bean的类加载器:
@Component
public class Student implements BeanClassLoaderAware {

    @Override
    public void setBeanClassLoader(ClassLoader classLoader) {
        System.out.println(classLoader);
    }
}
任务调度
为了执行某些任务,我们可能需要一些非常规的操作
比如我们希望使用多线程来处理我们的结果或是执行一些定时任务,到达指定时间再去执行。
这时我们首先想到的就是创建一个新的线程来处理,或是使用TimerTask来完成定时任务
但是我们有了Spring框架之后,就不用这样了,因为Spring框架为我们提供了更加便捷的方式进行任务调度。
异步任务执行 @Async
我们需要在配置类上添加@EnableAsync注解。
@EnableAsync
@Configuration
@ComponentScan("com.test.bean")
public class MainConfiguration {
    ...
}
接着我们只需要在需要异步执行的方法上,添加@Async注解即可将此方法标记为异步,当此方法被调用时,会异步执行,也就是新开一个线程执行,而不是在当前线程执行。
@Component
public class Student {
    public void syncTest() throws InterruptedException {
        System.out.println(Thread.currentThread().getName()+"我是同步执行的方法,开始...");
        Thread.sleep(3000);
        System.out.println("我是同步执行的方法,结束!");
    }

    @Async
    public void asyncTest() throws InterruptedException {
        System.out.println(Thread.currentThread().getName()+"我是异步执行的方法,开始...");
        Thread.sleep(3000);
        System.out.println("我是异步执行的方法,结束!");
    }
}
现在我们在主方法中分别调用一下试试看:
public static void main(String[] args) throws InterruptedException {
    AnnotationConfigApplicationContext context = new AnnotationConfigApplicationContext(MainConfiguration.class);
    Student student = context.getBean(Student.class);
    student.asyncTest();   //异步执行
    student.syncTest();    //同步执行
}
执行结果为:
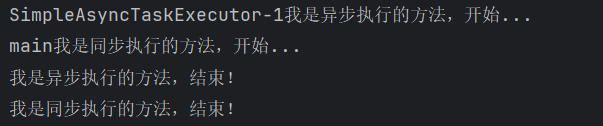
很明显,异步执行的任务并不是在当前线程启动的,而是在其他线程启动的,所以说并不会在当前线程阻塞,可以看到马上就开始执行下一行代码,调用同步执行的任务了。
因此,当我们要将Bean的某个方法设计为异步执行时,就可以直接添加这个注解。
但是需要注意,添加此注解要求方法的返回值只能是void或是Future类型才可以
还有,在使用时,可能还会出现这样的信息:

虽然出现了这样的信息,但是我们的程序依然可以正常运行,这是因为Spring默认会从容器中选择一个Executor类型(JUC有关)的实例,并使用它来创建线程执行任务
这是Spring推荐的方式,当然,如果没有找到,那么会使用自带的 SimpleAsyncTaskExecutor 处理异步方法调用。
原理
这个方法很明显我们并没有去编写异步执行的逻辑,那么为什么会异步执行呢?
这里很明显是同步调用的方法。的确,如果这个Bean只是一个简简单单的Student类型的对象,确实做不到。但是它真的只是一个简简单单的Student类型对象吗?
Student student = context.getBean(Student.class);
System.out.println(student.getClass());
//这里我们通过getClass来获取一下类型,你会发现惊喜
我们来看看结果:

实际上Spring帮助我们动态生成的一个代理类,我们原本的类代码已经被修改了,当然,这只是冰山一角,能做到这样的操作,这其实都是AOP的功劳。
定时任务 @Scheduled
定时任务其实就是指定在哪个时候再去执行,在JavaSE阶段使用过TimerTask来执行定时任务。
Spring中的定时任务是全局性质的,当我们的Spring程序启动后,那么定时任务也就跟着启动了,我们可以在配置类上添加@EnableScheduling注解:
不需要调用,默认启动就会运行
@EnableScheduling
@Configuration
@ComponentScan("com.test.bean")
public class MainConfiguration {
    ...
}
接着我们可以直接在配置类里面编写定时任务,把我们要做的任务写成方法,并添加@Scheduled注解:
@Scheduled(fixedRate = 2000)   //单位依然是毫秒,这里是每两秒钟打印一次
public void task(){
    System.out.println("我是定时任务!"+new Date());
}
我们注意到@Scheduled中有很多参数
我们需要指定'cron', 'fixedDelay(String)', or 'fixedRate(String)'的其中一个,否则无法创建定时任务,他们的区别如下:
- fixedDelay:在上一次定时任务执行完之后,间隔多久继续执行。
- fixedRate:无论上一次定时任务有没有执行完成,两次任务之间的时间间隔。
- cron:如果嫌上面两个不够灵活,你还可以使用cron表达式来指定任务计划。
这里简单讲解一下cron表达式:https://blog.csdn.net/sunnyzyq/article/details/98597252
监听器 ApplicationListener<xxx>
监听实际上就是等待某个事件的触发,当事件触发时,对应事件的监听器就会被通知
监听器可是很关键的,只不过在Spring中用的不是很频繁罢了。
但是这里还是要简单介绍一下:
@Component
public class TestListener implements ApplicationListener<ContextRefreshedEvent> {
    @Override
    public void onApplicationEvent(ContextRefreshedEvent event) {
        System.out.println(event.getApplicationContext());
        //可以直接通过事件获取到事件相关的东西
    }
}
要编写监听器,我们只需要让Bean继承ApplicationListener就可以了,并且将类型指定为对应的Event事件
这样,当发生某个事件时就会通知我们,比如ContextRefreshedEvent,这个事件会在Spring容器初始化完成会触发一次:

自定义事件 ApplicationEvent
Spring内部有各种各样的事件
我们也可以自己编写事件,然后在某个时刻发布这个事件到所有的监听器:
public class TestEvent extends ApplicationEvent {
    // 自定义事件需要继承ApplicationEvent
    public TestEvent(Object source) {
        super(source);
    }
}
对应设置监听器
@Component
public class TestListener implements ApplicationListener<TestEvent> {
    @Override
    public void onApplicationEvent(TestEvent event) {
        System.out.println("发生了一次自定义事件,成功监听到!");
    }
}
比如现在我们希望在定时任务中每秒钟发生一次这个事件:
@Component
public class TaskComponent implements ApplicationEventPublisherAware {
    // 要发布事件,需要拿到ApplicationEventPublisher
    // 这里我们通过Aware在初始化的时候拿到
    // 实际上我们的ApplicationContext
    // 就是ApplicationEventPublisher的实现类
    // 这里拿到的就是 我们创建的ApplicationContext对象
    ApplicationEventPublisher publisher;

    @Scheduled(fixedRate = 1000)   //一秒一次
    public void task(){
        // 直接通过ApplicationEventPublisher的publishEvent方法发布事件
        // 这样,所有这个事件的监听器,都会监听到这个事件发生了
        publisher.publishEvent(new TestEvent(this));
    }

    @Override
    public void setApplicationEventPublisher(ApplicationEventPublisher publisher) {
        this.publisher = publisher;
    }
}
根据提示,其实我们可以在main里面直接发布事件:
public class Main {
    public static void main(String[] args) throws InterruptedException {
        ApplicationContext context = new AnnotationConfigApplicationContext(MainConfiguration.class);
        context.publishEvent(new TestEvent(context.getBean(Student.class)));
    }
}
对应的事件的source参数随便给一个对象就行,表示这个事件的源头
